Set Up a Local Dev Container#
To simplify your development experience, a VS Code Development Container (Dev Container) has been set up with a fully-featured development environment. This guide provides a good overview if this is your first time working with Dev Containers.
Required Software for Local Dev Container#
- Git
Git is a command-line tool for a version control system that manages changes in the code repository. The default settings during installation are sufficient.
- Visual Studio Code (VS Code)
VS Code is the IDE we will use to write code. The default settings during installation are sufficient.
- VS Code Remote-Containers extension pack
The Remote-Containers extension pack will enable VS Code to work with dev containers.
- Docker
Docker is an open-source platform used to manage the provided pre-configured development container. The default settings during installation are sufficient.
- Windows
Docker Desktop 2.0+ on Windows 10 Pro/Enterprise. Windows 10 Home (2004+) requires Docker Desktop 2.3+ and the WSL 2 back-end
- macOS
Docker Desktop 2.0+
- Linux
Docker CE/EE 18.06+ and Docker Compose 1.21+. (The Ubuntu snap package is not supported.)
Remote hosts: 1 GB RAM is required, but at least 2 GB RAM and a 2-core CPU are recommended.
Getting everything ready#
Install all required software, above.
Accept a GitHub invitation to join the repository for the pre-configured development container hosted by artificialinc as an external collaborator. After accepting the invite, notify your Customer Success Manager.
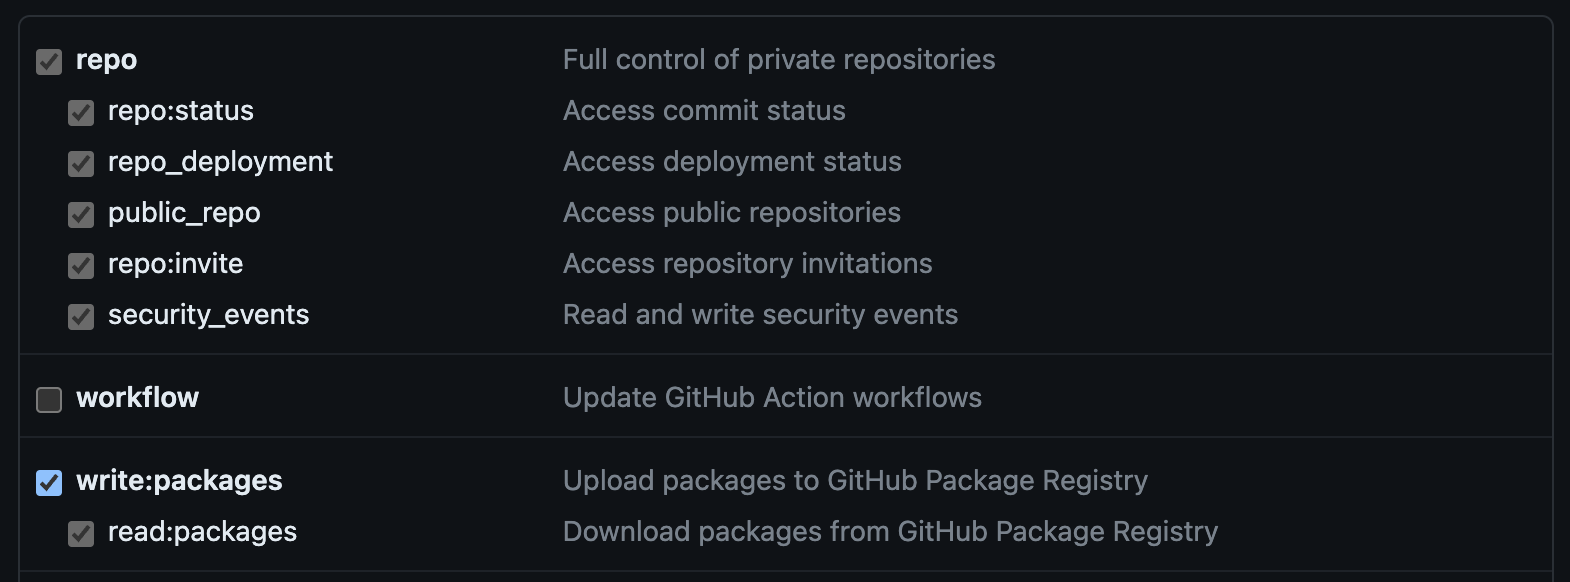
Log into GitHub and create a GitHub Personal Access Token (classic) with the repo and write:packages scopes by following these steps.
Copy the token to a secure place; we’ll use it later.
Note
Why do we need a GitHub token?
💡 We store development services and libraries in the Cloud, and you will need secure rights to access development libraries and call Cloud services.
Log into your Artificial instance and create an Artificial Personal Access Token for secure API access.
From Artificial, go to .
Set a Token Name (i.e, “my_token”), and click Create.
Copy the token to a secure place; we’ll use it later.
Repository setup#
Use Git to clone your Artificial Repository using the URL your Artificial Customer Success representative provided.
$ mkdir artificial-sdk
$ cd artificial-sdk
$ git clone https://github.com/<repository>
Create a
secrets.yamlfile in theconfigs/<your project context folder>directory. It should live next to theconfig.yaml. It must contain the following:artificial: token: <Artificial Personal Access Token>
Create a
.envfile in the base project directory with your GitHub login and token created from the previous steps:PYPI_USER=<github username> PYPI_PASSWORD=<github Personal Access Token>
Follow these instructions to make sure that your SSH keys are shared with the dev container.
Launching the Dev Container#
Open your project folder in VS Code (not a sub-folder).
Note
💡 You may have to sign into Git to enable some features of the dev container. If prompted, configure it according to your personal preferences with the help of sharing git credentials.
If you see a popup dialog like this in VS Code, select Reopen in Container
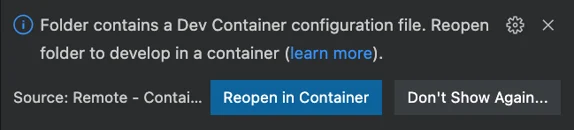
If you don’t see the popup dialog, open the Command Palette (F1 or Command+Shift+P), and select Dev Containers: Rebuild and Reopen in Container to run the dev container.
If you see get popup dialogs about restarting, then follow the prompts to restart.
Note
The first time you open and build the Dev Container, it might take some time (depending on your internet connection) to download the container image and install dependent libraries into the container. After the initial build of the container, opening the folder with the container afterward is significantly faster.
Note
💡 On Windows, you may run into issues building the Dev Container if your global git settings specify CRLF line endings. To fix this, run the following command in your terminal to set the core.autocrlf setting to true.
For more information, see configuring line endings.
git config --global core.autocrlf true
After the build is complete, you will have a functional dev environment with all the plugins and support libraries for developing workflows, actions, and client utilities. This includes extensions so you can easily write and debug Workflows in Artificial.
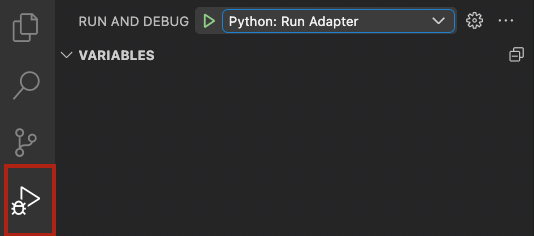
Running your Adapter#
The Dev Container has the necessary files to connect to the Artificial Cloud instance that will be used for development. You can run the code from the container by clicking the Run and Debug tab in VS Code and pressing the green Run button.