Connecting to Hamilton Venus#
This guide will walk you through how to connect Artificial to Hamilton Venus using the Hamilton Venus Resource Library.
Attention
Before you get started, make sure your local Adapter development environment is set up and ready to go.
Supported Venus versions#
Venus 4 (4.5), Venus 5 (4.6), Venus 5 with Dynamic Scheduler (5.1), Venus 5 with Venus on Vantage (VoV) (2.2.13)
Install the driver#
Download and install the Artificial Hamilton Venus Driver on the PC where Venus is running.
Note
For more information on how to install and configure the Driver, see our guide on Installing and Configuring Device Drivers.
After installation, open the Hamilton System Configuration Editor. In Error Settings, set Execute Program to Enabled. Set Program File to:
C:/Program Files (x86)/Artificial/ArtificialHamiltonServer/Artificial.HamiltonErrorEventHandler.exe
Install the Resource Library in your Adapter#
Run the following command in the terminal of your adapter repository to install Artificial’s Hamilton Venus Resource Library:
uv add artificial-venus-resource-library>=1.0.1
Your pyproject.toml file should now include artificial-venus-resource-library in the project dependencies section:
[project]
dependencies = [
  ...
  "artificial-venus-resource-library>=1.0.1"
]
Update your Adapter Config#
config.yaml#adapter:
name: HamiltonTutorialAdapter
remoteConfig: False
allowAnySequenceId: True # Useful when running in a local dev container
plugin: # all resources this adapter can connect to
resource:
name: "My Hamilton" # user friendly name, unique in the adapter
id: "hamilton" # This should match the device key in the asset_sync section below
driver:
name: "hamilton" # Driver name, this is a non-configurable string that needs to match the driver identity
url: "http://myhamilton.webaddress.com:49835" # URL of the hardware and driver
resource_simulation: false # Set to true to run simulation without hardware
driver_simulation: false # Set to true to run simulation without a driver
cert_file: "adapter/certs/ca.crt"
asset_sync:
devices: # device string names/prefix must match resource id above
"hamilton": { rid: "d1234567-34d0-4391-be64-7aef4e0b28be" }
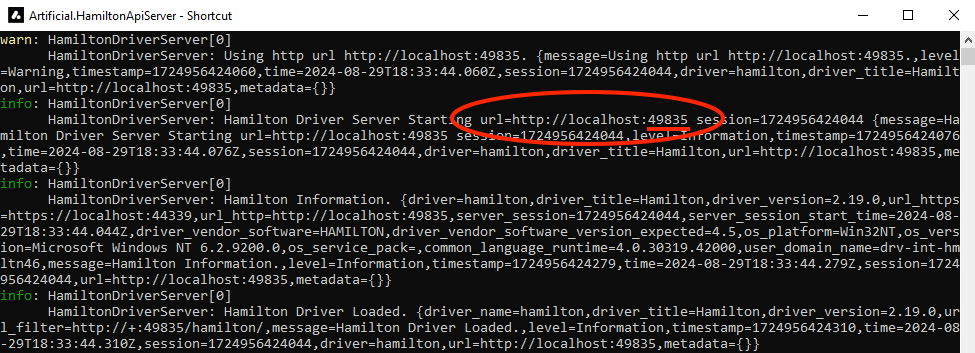
Fill in the correct URL (including the port) for the Hamilton device. The device’s IPv4 URL can be obtained from Network & Internet Settings or by running
ipconfigin a command window. The port is listed in the running driver server console window.
You may update the resource name above if you wish. Any string will work but it must be unique across the instance.
If you wish to run in simulation without hardware or without a driver, change
resource_simulationordriver_simulationtotrue, respectively.Update the
asset_syncsection to map the resource id to the instrument’s asset instance id in the digital twin. You can fill out the rest of the devices later. See Asset Sync Config for more information.
Use the Resource Library in your Adapter#
adapter/main/plugin.py file#from artificial.adapter_common import ActionModulePlugin, ability_name, action_modules
from artificial.adapter_common.plugin import PluginContext, plugin_config
from artificial.logging import get_logger
from artificial.resource_base.asset_syncer import ResourceAssetSyncer
from artificial.resource_base.models import PluginConfig, SyncConfig
from artificial.venus.actions import VenusActions
from artificial.venus.core import VenusResource
from artificial.venus.event_handler import VenusEventHandler
logger = get_logger(__name__)
@action_modules(VenusActions)
class AdapterPlugin(ActionModulePlugin):
"""assemble resources components with resource configuration"""
_cfg = plugin_config(PluginConfig) # this will make PluginConfig show up in the adapter config UI
async def setup(self, pctx: PluginContext) -> None:
plugin_conf = self._cfg
prog_config = pctx.config
sync_config: SyncConfig = pctx.raw_config.to_dataclass(SyncConfig, 'adapter.asset_sync')
logger.debug(f'sync_config loaded: {sync_config}')
# all resources in the adapter use the same res_syncer
syncer = pctx.asset_sync_manager_v1(f'ResourceSyncer-{prog_config.adapter.name}')
res_syncer = ResourceAssetSyncer(syncer, sync_config)
await res_syncer.initialize()
# creat instances of resources for this adapter
resource = VenusResource(
pctx.alabPyBase,
lab_id=prog_config.artificial.labId,
adapter_id=prog_config.adapter.name,
resource_id=plugin_conf.resource.id,
name=plugin_conf.resource.name,
res_syncer=res_syncer,
)
if resource: # hook up action modules and event handlers
resource.set_driver(driver_config=plugin_conf.resource.driver, simulator=None)
await resource.set_health_monitors(pctx.lab.health)
self.add_module(VenusActions(resource))
# subscribe the driver events
event_handler = VenusEventHandler(resource)
resource.add_event_handler(event_handler)
Add the required Actors#
Add the following actors to the list of actors in adapter/main/__main__.py.
adapter/main/__main__.py#actors = [
ActorConfig(id='hamilton', abilities={'run_protocol': 1, 'substrate': 1, 'venus': 1}),
]
Publish and run a test Workflow#
This workflow will run a method of your choosing and log a message in the UI upon successful completion. You will define which method in the request UI by inputting the method name with its full path (e.g., C://Methods//mymethod.med).
Note
Update the variable params to reflect the needs of your protocol. If your protocol does not require variables, set params to an empty list ([]).
from typing import List

from artificial.workflows.decorators import parameter, workflow
from artificial.workflows.runtime import show_info
from stubs.stubs_actions import VariableType, run_protocol_to_completion


@workflow('Simple Venus Connectivity Test Workflow', 'simple_venus_connectivity_workflow')
@parameter('method_full_name', {'required': True, 'uiTitle': 'Instrument Method Name'})
async def simple_venus_connectivity_workflow(method_full_name: str) -> None:
    params: List[VariableType] = [ ]
    await run_protocol_to_completion(protocol_full_name=method_full_name, parameters=params)
    await show_info('Congratulations, you successfully ran your hardware!', 'Hardware Success')